

Learn how to paint a door with a roller in easy steps. Get a smooth and even finish with this simple DIY guide. Perfect for beginners and experienced DIYers alike.
Are you tired of looking at the same old boring door every day? Painting your door can give it a fresh new look and add some personality to your home. But if you’re not familiar with the process, it can be intimidating.
Don’t worry, though – painting a door with a roller is actually quite simple. With a little bit of preparation and some easy-to-follow steps, you can give your door a professional-looking finish in no time. In this guide, we’ll walk you through everything you need to know to paint a door with a roller.
1. Gather Your Supplies
To paint a door with a roller, you will need the following supplies:
- Paint roller: Choose a roller with a medium nap, typically around 3/8 to 1/2 inch, to ensure that the paint will go on smoothly and evenly.
- Paint tray: Use a paint tray with a disposable liner or a reusable tray that can be cleaned after use.
- Paint: Choose a high-quality paint that is specifically designed for doors and trim. This will ensure that the paint goes on smoothly and dries to a durable finish.
- Paintbrush: Use a brush to paint any areas that the roller cannot reach, such as the edges of the door or around the hardware.
- Sandpaper: Use sandpaper to smooth out any rough spots or imperfections on the door before painting.
- Painter’s tape: Use painter’s tape to protect any areas that you do not want to paint, such as the hinges or the door handle.
- Drop cloth: Use a drop cloth to protect the floor or any surrounding areas from paint splatters or spills.
- Cleaning supplies: Have cleaning supplies on hand to clean up any paint spills or drips, such as a damp cloth or paper towels.
With these supplies, you will be ready to paint your door with a roller.
Prepare the Door Surface
If you’re planning to paint your door, the first step is to prepare the surface. This will ensure that the paint adheres well and looks smooth and even. Here’s a step-by-step guide to help you prepare your door surface for painting.
Step 1: Remove the Door Hardware
Before you start, remove the door hardware such as the knobs, locks, and hinges. This will make it easier to paint the door and ensure that the hardware doesn’t get in the way.
Step 2: Clean the Door Surface
Using mild detergent and water, clean the door surface thoroughly. This will remove any dirt, grime, or grease that may be present on the surface. Rinse the door with clean water and let it dry completely.
Step 3: Sand the Door Surface
Using fine-grit sandpaper, sand the door surface lightly. This will help remove any rough areas or bumps on the surface. Make sure to sand in the direction of the wood grain.
Step 4: Fill any Holes or Cracks
If there are any holes or cracks on the door surface, fill them with wood filler. Smooth out the filler with a putty knife and let it dry completely.
Step 5: Sand Again
Once the wood filler is dry, sand the surface again to ensure that it’s smooth and even.
Step 6: Prime the Door
Apply a coat of primer to the door surface. This will help the paint adhere better and ensure a smooth finish.
By following these steps, you can prepare your door surface for painting and achieve a professional-looking finish. Happy painting!
3. Apply the Primer
Before painting a door, it is important to apply a primer to ensure that the paint adheres properly and lasts longer. Here are the steps to apply primer to a door:
- Remove any hardware: Before you start painting, remove any hardware from the door, such as knobs, hinges, or locks. This will make it easier to paint the door and ensure that the hardware does not get painted.
- Clean the door: Use a damp cloth to clean the door and remove any dirt, dust, or debris. Allow the door to dry completely before proceeding.
- Sand the door: Use sandpaper to lightly sand the door to create a rough surface that the primer can adhere to. Be sure to sand any areas that are rough or peeling.
- Apply the primer: Stir the primer thoroughly before use. Apply the primer to the door using a paintbrush or roller, starting at the top and working your way down. Be sure to apply the primer evenly and avoid drips or runs. Allow the primer to dry completely before proceeding.
- Sand the door again: Once the primer is dry, use fine-grit sandpaper to lightly sand the door again. This will help to smooth out any rough spots and ensure that the paint adheres properly.
- Clean the door again: Use a damp cloth to clean the door again and remove any dust or debris from the sanding. Allow the door to dry completely before proceeding.
Once the primer is applied, sanded, and cleaned, you are ready to paint the door with your chosen paint color.
4. Choose the Right Paint
When choosing the right paint for a door, it is important to consider the following factors:
- Type of door: The type of door you are painting will determine the type of paint you should use. For example, if you are painting an exterior door, you will need paint that can withstand the elements, such as rain and sunlight. If you are painting an interior door, you can use a paint that is designed for indoor use.
- Finish: The finish of the paint will determine the sheen or glossiness of the final product. For a door, it is recommended to use a semi-gloss or high-gloss finish, as these finishes are more durable and easier to clean.
- Color: Choose a color that complements the room or exterior of your home. Consider the color of the walls, trim, and other elements in the room or the color scheme of the exterior of your home.
- Quality: Choose a high-quality paint that is specifically designed for doors and trim. This will ensure that the paint goes on smoothly and dries to a durable finish.
- Application: Consider the application method you will be using, such as a roller or brush, and choose a paint that is suitable for that method.
By considering these factors, you can choose the right paint for your door that will provide a durable and beautiful finish.
5. Begin Painting
To begin painting a door with a roller, follow these steps:
- Prepare the door: Remove any hardware from the door, such as knobs, hinges, or locks. Clean the door thoroughly and allow it to dry completely.
- Apply painter’s tape: Use painter’s tape to protect any areas that you do not want to paint, such as the hinges or the door handle.
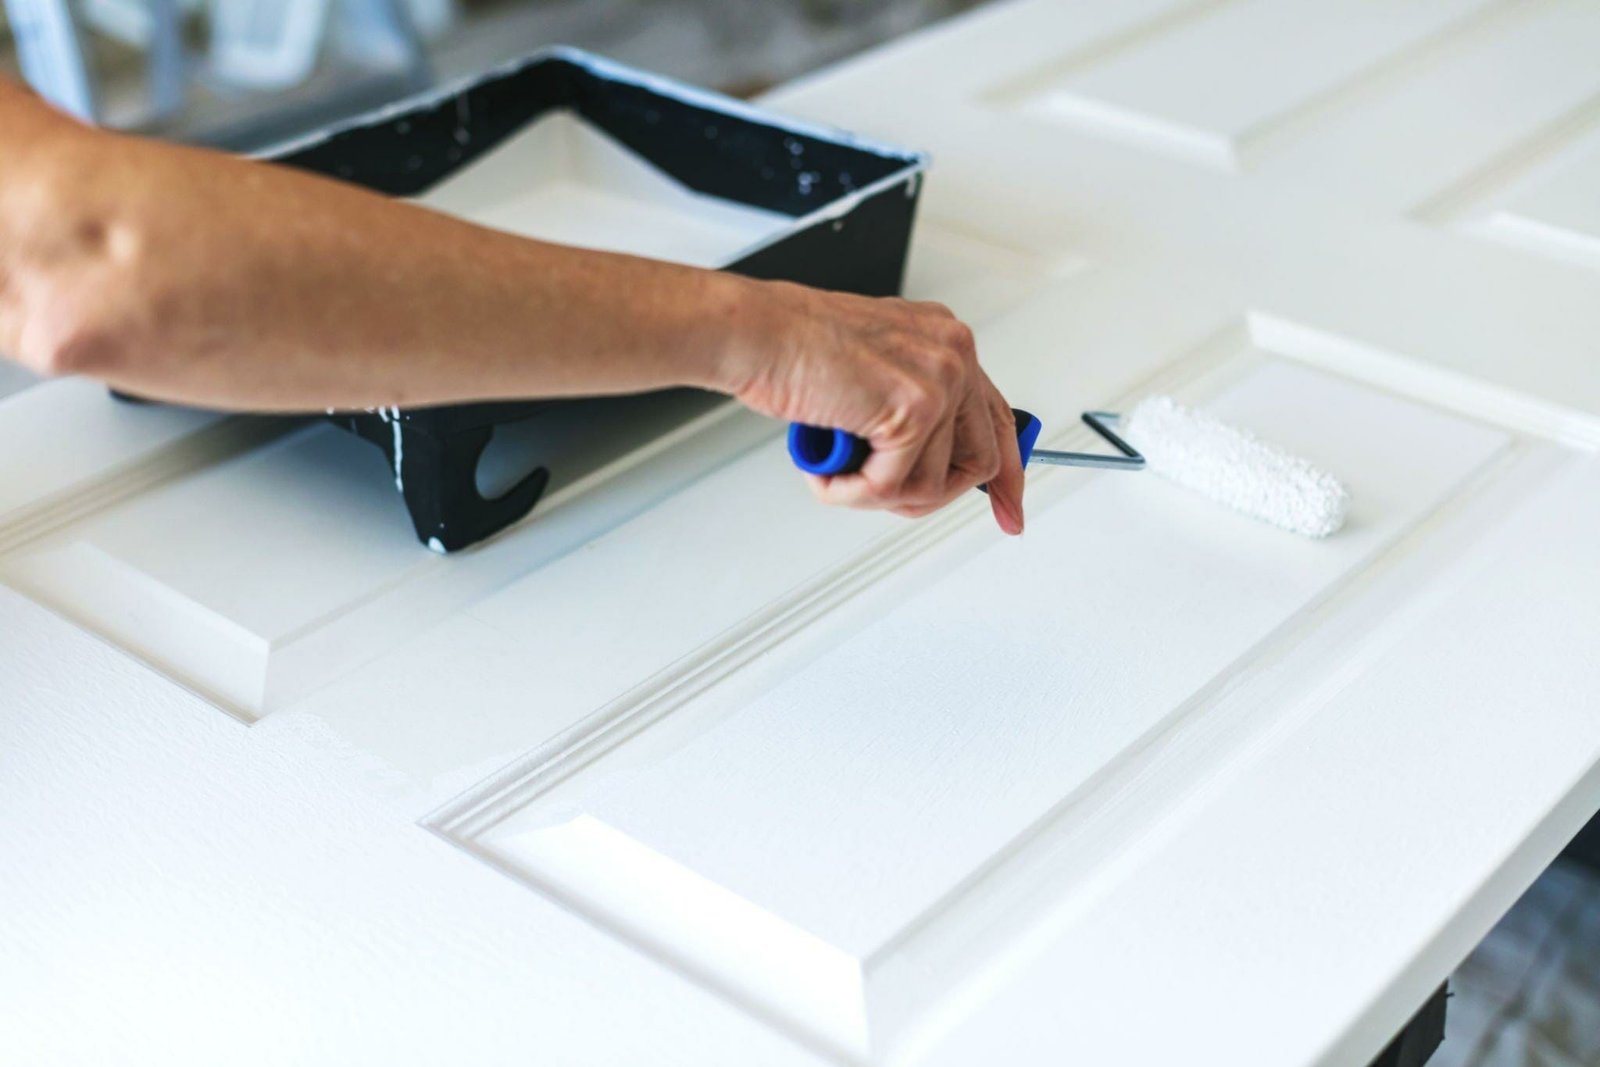
- Apply the paint: Stir the paint thoroughly before use. Pour some paint into the paint tray and load the roller with paint. Start at the top of the door and work your way down, using long, even strokes. Be sure to apply the paint evenly and avoid drips or runs. Use a brush to paint any areas that the roller cannot reach, such as the edges of the door or around the hardware.
- Allow the paint to dry: Allow the first coat of paint to dry completely before applying a second coat. Follow the manufacturer’s instructions for drying time.
- Apply a second coat: Once the first coat is dry, apply a second coat of paint using the same technique as before. This will ensure that the paint is even and fully covers the door.
- Allow the paint to dry completely: Allow the second coat of paint to dry completely before removing the painter’s tape and reattaching any hardware.
By following these steps, you can paint a door with a roller and achieve a smooth and even finish.
FAQs
1. How to paint a door with a roller without leaving streaks?
To avoid leaving streaks when painting a door with a roller, start by using a high-quality roller cover and avoid overloading the roller with paint. Apply the paint in a W pattern, then go over the area with light, even strokes to smooth out any marks.
2. Can I paint a door with a roller instead of a brush?
Yes, you can paint a door with a roller instead of a brush. Using a roller can help you achieve a smooth, even finish in less time than using a brush. Just be sure to choose the right roller cover for your project and follow the proper technique to avoid leaving streaks.
3. How many coats of paint do I need when painting a door with a roller?
The number of coats of paint you’ll need when painting a door with a roller will depend on the color and type of paint you’re using, as well as the condition of the door. In general, you’ll likely need at least two coats of paint to achieve full coverage.
4. What is the best type of roller to use when painting a door?
When painting a door with a roller, it’s best to use a high-quality roller cover made of synthetic materials, such as nylon or polyester. Look for a roller cover with a medium nap, which will allow you to apply the paint evenly without leaving too much texture behind.
Conclusion
Painting a door with a roller is a simple and effective way to give your home a fresh new look. By following the steps outlined in this guide, you can achieve a professional-looking finish that will last for years to come.
Remember to choose the right roller for your project, and to prepare your door properly before painting. With a little patience and attention to detail, you can transform your door into a beautiful focal point for your home. So why not give it a try? You’ll be amazed at the difference a fresh coat of paint can make. Happy painting!


Leave a Reply
You must be logged in to post a comment.