
How to stain a fence with sprayer? Let’s get straight into the solution. A fence is a great way to enclose a yard as well as provide privacy. In addition, some make the best of a view by looking out from behind a fence.
In some cases, it may be necessary to stain the fence. The process can be difficult and messy but it’s worth it! A sprayer is typically used for this task because it allows an even spread of the wood preservative on all sides of the fence for a perfect finish.
Stain fencing is an inexpensive way to beautify your yard, but it also serves a functional purpose by protecting the fence from weather damage. Keep reading for step-by-step instructions on how to successfully stain a fence.
How To Stain Fence With Sprayer?
Step One: Purchase Stain and a Sprayer
You’ll want to purchase a stain that specifically says it can be applied with a sprayer. Also, buy a sprayer from the same brand as the stain you choose. Stain and sprayers are not always available at all home improvement stores. If you have trouble finding them, try checking with landscape supply or paint stores. Stain and sprayers can also be purchased online.
Step Two: Clean the Fence and Prepare for Staining
Prior to staining, clean your fence by rinsing it down thoroughly with a hose. Let it dry completely before beginning the stain application process.
You will then need to remove any peeling paint or splintered wood. Once you’re done, the fence should be completely clean and free of anything that could clog your sprayer nozzle.
Step Three: Stain the Fence
Hang the sprayer full of stain upside down for approximately 30 minutes or until all liquid has drained out.
Then, hook up the sprayer to a garden hose and turn on the water. You should start to see a stain come out of the nozzle.
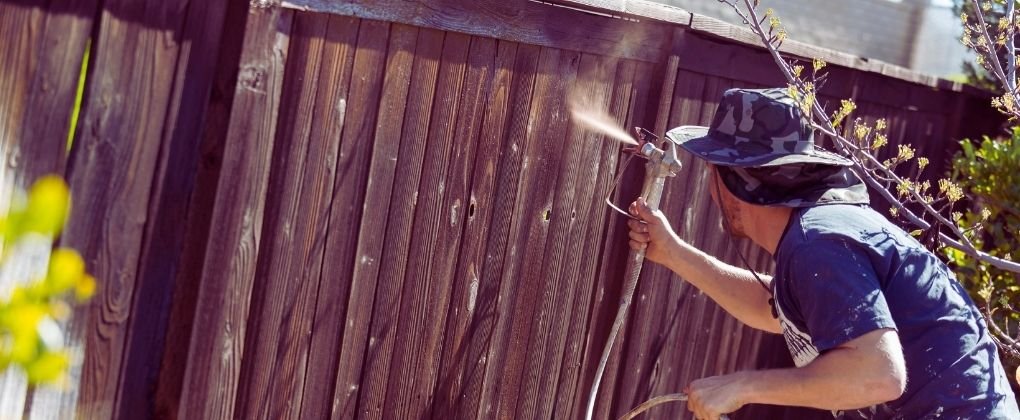
Once everything is hooked up, you can begin staining your fence. Begin by applying a light coat all over your fence with a sweeping motion from left to right. The stain will drip off the fence at first but will become even as it soaks into the wood. Stain some areas more than others if you want some parts of your fence to be darker than others.
After applying this light coat, you can continue staining by applying additional coats in any areas that need more coverage or darkness. You should allow each coat to dry for approximately 30 minutes before applying the next one.
Stain is going to be unpredictable and blotch up, so don’t panic if it looks uneven or spotty after a few hours of dry time.
Step Four: Clean Up and Wait
Once you’re satisfied with your color choice, allow the stain to dry completely overnight or for at least eight hours before allowing anyone or anything to come into contact with the fence. Stain can be very difficult to clean up if it drips on sidewalks, plants, etc., so be sure everything is kept off of your freshly stained fence until dry time has been completed.
After everything has dried completely, you’re done! Stain your fence whenever you see fit, whether it’s after one season or 100. Stain can be applied once every year if desired.
Read Also: Best paint sprayer for deck stain
10 Tips To Stain A Fence with Sprayer
- Read the instructions on your can of stain thoroughly before beginning to stain your fence. Stain is made differently depending on the brand, so you want to make sure you do not miss any important information.
- Stain colors are usually created with a base of pigment and natural oils, so one type of wood may look drastically different than another because it takes stains differently. Stain a section of your fence to see how the color of the wood changes before staining the entire fence.
- Stain with a sprayer will produce a softer tone than staining by traditional methods, so if you want a bolder color, use paint instead of stain on your fence.
- Stain is easy to wipe off of wood posts, but be very gentle when applying to the lattice. Stains can quickly turn your lattice a different color if you apply too much.
- Stain is easier to remove from concrete than paint, so protect your patio by placing cardboard between it and the fence before staining the fence.
- The stain will prevent your fence from absorbing sunlight, which can damage the wood over time. The stain will deepen the color of your fence while protecting it from the elements.
- The stain will protect against mold and mildew on fences that sit in moist areas or near water sources like ponds or creeks. The stain is not waterproof but will keep out some moisture so your fence won’t become damaged by rain or standing water.
- Stain can be applied anytime during the year, though spring and summer are best for even application of color to avoid streaking caused by cool weather changes throughout the day. Fall offers fewer chances of bad weather, but winter will cause problems for applying stains with a sprayer because of cold temperatures and wind chill.
- Remove debris from your fence before staining so you can also clean your fence while protecting it. The stain will keep out leaves, dirt, and other debris to help prolong the life of your fence.
- Stain is water-based, so be sure that you use a paintbrush or roller with half-inch synthetic bristles for the best results. You may also want to wear gloves to protect your hands from extended contact with the stain because it causes dry skin and irritation even if washed off immediately.
How to Stain A Fence Without Sprayer?
Stain a fence without a sprayer? Yes, you can stain a fence without a sprayer.
You are not alone in this dilemma of how to stain a fence without the use of a sprayer. So many people are suffering from the same problem. Stain is spilled on grass or other objects around. Stain is wasted by spraying It haphazardly on the fence.
The process is time-consuming and frustrating if you do not have the right tools. Stains can also drip excessively, causing stains to run down along the fence boards.
you can stain a fence without a paint sprayer by using an ordinary garden sprayer. This method is quick and easy, but not necessarily the most efficient or effective way of applying stain to your fence. Stains can drip onto objects near the fence, so you can also use a paint brush for this project.
First, Stain the Fence Using a Garden Sprayer
Mix together your choice of stain with water. You will need a separate container for this mixture.
Attach the garden sprayer to the container of mixed stain, then turn on your water source to wet the sprayer nozzle. Shake off any excess liquid from the nozzle before applying Stain.
Spray Stain onto Fence Boards in an even motion, starting at one end and working your way to the other. The stain will drip off, but this is normal. Allow the stain to dry before applying another coat. Repeat the process until Stain has reached desired darkness.
Second, Stain the Fence Using a Paint Brush
Mix together your choice of stain with water. You will need a separate container for this mixture.
Pour this mixture into a paint tray or other container. Prepare your paint brush by wetting the bristles lightly in a separate container filled with clean water, then use this moistened brush to apply Stain to fence boards.
Work from one end of the fence to the other in an even motion. The stain will drip off, but this is normal. Allow the stain to dry before applying another coat.
Repeat the process until Stain has reached desired darkness.
Tips For Stain Fence Without Sprayer:
You can also choose to Stain a fence without a sprayer by using a low-pressure garden hose and a paint bucket or any other container that will hold both stain and water mixed together if you do not wish to Stain your fence with a sprayer.
Do not Stain the Fence When the Temperature is above 50° Fahrenheit or 10° Celsius, otherwise, Stain will dry too quickly and have poor penetration into wood boards.
Wait for colder days or chilly nights for Stain application. Stain can also be applied during Fall weather before the temperature dips too low.
What is Stain? A stain is a paint that contains pigment or dye that has been dissolved in oil, water, or other liquid. Linseed oil-based stain is typically used on fences because it provides a strong, durable finish.
Stain is available in a wide range of colors. Stain does not have as long of a shelf life as paint, so be sure to check the expiration date on your can before staining your fence. The stain will not dry like paint and it takes several days to cure fully after application.
FAQs
Q. Can i stain my fence with a brush?
Yes, you can stain your fence with a brush. Just make sure to choose a brush that is designed for use with stain, and follow the instructions on the stain can for best results.
Q. How much stain will i need for fence?
It depends on the size of your fence and the type of stain you choose. A gallon of stain covers about 200 square feet, so you’ll need to calculate the square footage of your fence to determine how much stain you’ll need.
Q. What stain should i use for fence?
There are a few different types of stains that can be used on fences. Some of the most popular options include oil-based stains, water-based stains, and semi-transparent stains. Each type of stain has its own advantages and disadvantages, so it’s important to choose the right one for your particular fence.
Q. What stain should i use on my cedar fence?
There are a few different types of stains you can use on a cedar fence, depending on the look you’re going for. A clear stain will protect the wood while still allowing the natural grain to show through, while a semi-transparent or solid stain will give the fence more color. You can also choose between oil-based and water-based stains. Talk to your local hardware store or home improvement center to get advice on which type of stain would be best for your fence.
Q. What stain should i use on my pressure-treated wood fence?
There are a few different types of stains that can be used on pressure-treated wood fences. Some of the most popular choices include semi-transparent stains, solid stains, and clear sealers. Each type of stain has its own advantages and disadvantages, so it’s important to choose the one that best suits your needs. Semi-transparent stains will allow the wood grain to show through while still providing some protection from the elements, while solid stains will provide more coverage and protection.
Q. Can stain be applied to a new wood fence?
Yes, stain can be applied to a new wood fence. However, it is important to note that the stain will not protect the wood from weathering or wear and tear.
Q. How long does the stain last on fence?
Stain can last anywhere from 1-3 years on a fence, depending on the quality of the stain and how well it is maintained. If you take good care of your fence and reapply stain as needed, it can last for many years.
Q. Can stain be applied in direct sunlight?
Yes, stains can be applied in direct sunlight. However, it is important to keep in mind that the heat from the sun can cause the stain to dry quickly, so you will need to work quickly and be sure to keep an eye on the stain to avoid any unwanted results.
Conclusion:
Staining your fence with a sprayer is a quick and easy way to achieve even coverage. When selecting a stain, be sure to choose one that is durable and compatible with the type of wood your fence is made of. With a little bit of prep work and the right supplies, you can have a beautiful stained fence that will last for years to come.


Leave a Reply
You must be logged in to post a comment.